The IP Engineering ‘Kate’ Pressfix kit arrived last week, along with a bottle of MEK solvent, so I started putting it together this weekend. The good news is, it’s a lot more straightforward, quicker and less excessively gluey to construct than messing around with whitemetal and epoxy.
…The flip side of this is, it’s really easy to go charging on with the build and then discover you’ve welded two of the parts together the wrong way round. Which is what I did.
Three times.
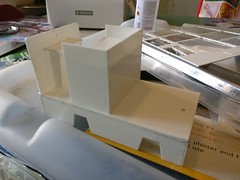
Go, me! First I carefully filed and positioned the chassis side against the base, stuck it firmly in place and then, admiring my work, realised it was facing the wrong way. So that had to be cut away and re-fixed. Then I put the control panel in upside-down relative to the cab - the clue is in the rounded corners on the top edges. So I took a file and rounded off the corners on the new top edges, then filled the original corners at the base. And finally, I carefully threaded an axle through the motor chassis only to discover I’d firmly attached one side of that upside-down as well; out came the craft knife again. Fortunately (?), the joints come apart more cleanly than the word ‘welded’ would imply, although I suppose there is a risk of snapping something if they don’t (but then you can always weld the pieces back together with more solvent, right?).
Honestly, if I were reading this, I’d be fuming at the blatent ineptitude on display here. Each time, I carefully oriented the pieces against the photos on the instruction sheet, then deftly managed to change my grip and twist one round after brushing on the MEK. It’s safer to fit the pieces together first, flood the join with solvent using a brush and then, once they’re attached, paint more solvent on the other side too if necessary.
The blurb on IPE’s website kind of implies that each piece has tabs which are glued together. I tend to think of HGLW’s wooden kits with their interlocking tabs when I read this. In fact, they mean that the pieces are delivered on single sheets of plastic with small moulding tabs to hold them in place, which you cut through to release the part. You’re still going to be sticking edges and corners together, although at least MEK sets quickly and strongly. Hilariously, the instructions tell you to attach the back panel “0.5mm” from the end of the base, as if somehow that kind of precision and tooling is available here at the R&R. “Or wing it by eye, Ade, you massive bodger”, they might have added.
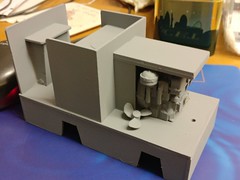
Anyway, by close of Sunday, the basic shell and all the detail parts had received two coats of car spray primer and only “now paint your model” and some soldering stands between this and completion. I’ve been looking at prototypes on Google to get some idea of paint schemes for Hudson Hunslets, and it seems anything goes so long as it’s fairly dowdy and plain. Typically, it’s green for the bodywork, black for the radiator grill and a kind of grimy opaqueness for the engine. However, many examples boast bright red buffer beams which perk them up no end, so I’ll probably adopt that. If I don’t manage to stick the wheels to the bonnet instead.