I know, I can’t quite believe it either. Twelve years of dither and delay resolved.
For those interested, the tendering process went something like this:
- Roundhouse’s manufacturing was on hiatus due to the COVID-19 crisis, and as they make their basic locos in small batches based on pre-orders, there were none in the retail channel.
- Roy Wood’s “Janet” really is a lovely engine about which I’ve never seen a bad report, but Roy told me he has an 18 month backlog on making them. I know this is a relatively short interval after twelve years but even I now wanted something running this year, so reluctantly I passed.
- Accucraft models all became prohibitively expensive following exchange rate changes post 2016.
- Mamod have been on a bit of revival after transferring production of
their older tablet-fired model line to MSS. Still, their range has some
… iiiinteresting offerings right down to the (relative) budget end.
Moreover, they’re starting to compete with Roundhouse in the upper
bracket of that market and they sometimes offer more for the money even
if the quality may not yet entirely match. Some of their models are a
little too basic, some have particular teething issues and one or two
are a bit too distinctive-looking. And I do like the open cab
appearance of locos like Millie and Janet.
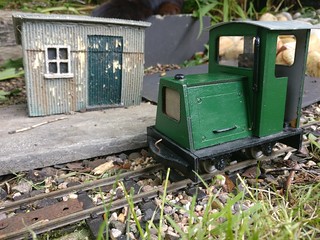
Except it turns out Mamod have their own open cab loco based on the ‘Stirling’ chassis, which they somewhat generously interpret as a “Quarry locomotive”. I really liked it. Particularly when I found out that John Sutton Models sell it in red.
And then it turned out the budget could be stretched slightly further too.
Hence the Quarry loco in red it was. The internal firing, displacement lubricator and useful extras (you get steam oil, lubrication oil, a syringe and a funnel in the box with it - everything bar gas & water) clinched it. (There’s a nice overview of it on Youtube if you want to know more.)
Some things you discover from running live steam
- I’d forgotten that I’m a bit leery of even camping gas stoves, and at least they don’t run away from you while you’re trying to adjust them.
- There are some good guides and instructional videos out there but very few quite cover all the detail. Some trial and error and a little faithful persistence is still called for.
- If your track has any variation in gradient, however minute or localised, boy will you become aware of it. Similarly, tight radius curves are great for slowing down runaway engines, or stopping them altogether.
- Put a nearly 3kg loco on your loose floating track and it will move around, probably in ways you won’t like. Some regular derailments at the end of the day turned out to be caused by the joiners separating at one point; my mending plates hold the track down but, by design, they don’t prevent longitudinal movement.
- Similarly, the faster your trains go, the more weight and stability you
will need in your wagons, especially if your track isn’t magnificently
smooth. A plastic wagon that will trundle around for an hour at a scale
10mph very quickly tips over or derails at three times the speed. (And
there is nowhere obvious to add extra weight on the skeletal chassis of
a Binnie tipper.)
On the other hand, large heavy carriages will suddenly be a much more practical proposition.
It was fun. I can’t say it was relaxing; after a running session, I was sweating heavily from leaping up and down to push, adjust, re-couple or rescue a scalding hot locomotive that’s only slightly less unpredictable than a nervous cat and more temperamental. Judging by how the backs of my legs feel today, it was good exercise at least. But I think I find small battery-powered industrial engines more therapeutic than ever for just watching trains.
More videos when I start to get a better handle on all this and can dare leave it alone long enough to hold a camera steady.
(With thanks to Ant, Richard and Simon for advice and troubleshooting.)
]]>